Acumatica Landed Cost and Complex Calculations
A step-by-step guide to help you properly set up and use the Acumatica landed cost transactions feature built in to your ERP.
Landed costs are the additional charges for freight, customs, duties, and tax that businesses must account for when shipping inventory. Landed Costs can be applied to domestic and international orders and are based on incoming PO Receipts for Stock Items where the landed cost needs to be reflected in the received Item Cost. It is critically important to accurately allocate landed costs, but these numerous costs can be hard to handle because they typically feature different calculation methods (quantity, cost, weight, and volume).
If landed cost transactions are a consideration for your company, you have probably already noticed that Acumatica Cloud ERP conveniently comes with a landed cost transaction feature.
In this article, you will learn how to set up and use the Acumatica landed cost transaction feature to handle complex calculations seamlessly for your business.
Why Simplify Landed Cost Transactions?
At a glance, landed costs may seem easy enough to enter and allocate. After all, landed costs such as freight, customs, duties, and tax charges are itemized on the invoices you receive from international customs agenciesor as domestic receipts for freight, handling, packaging, etc.
For example, imagine you run a company headquartered in Puerto Rico with an additional location in Jamaica. When you ship items from Puerto Rico to Jamaica, what should be a simple cross-company sale suddenly becomes a massive landed cost calculation. Every item you ship to Jamaica is subject to freight, customs, duties, and tax charges – and that drives up the average price of those items.
Clearly, your company needs to track your landed costs in order to determine the numbers behind your profitability on Jamaica versus Puerto Rico.
It can be tempting to choose the seemingly “fast and easy” method of using a spreadsheet to track and allocate these costs, but landed costs have a habit of becoming complicated quickly. Busy business leaders soon realize that the many types of landed costs transactions break down into too many complex categories to easily track on a spreadsheet.
Problem: It is not uncommon for a “straightforward” landed cost transaction spreadsheet to contain 70+ lines, resulting in hours of manual entry!
Solution: With just a little bit of initial work, it is easy to configure landed costs in Acumatica, saving hours of work and reducing errors.
Since tracking and allocating landed costs using a spreadsheet is likely to become overly complex in a very short time and can take hours of manual entry on your end, it is a much better choice to leverage the built-in power of your ERP to do the work for you.
How to Enter and Allocate Your Landed Cost Transactions into Acumatica – Step by Step
Customs agencies typically have a long list of various costs and fees that they charge your business. These may include inland freight, ocean freight, postage, duties, and many other charges. These are referred to as landed costs.
Some landed costs, such as Freight, apply to all items in a shipment. Some landed costs, such as the Ocean Freight example we use in this How To article, apply to only some of the items in a shipment. As you are creating your landed cost codes, carefully consider how many different codes your business requires, based on allocation methods.
Tip: Instead of choosing Ocean Freight for this example, we could have simply created a Freight cost code that was allocated by volume. However, in that case, all costs under the Freight cost code would always be allocated by volume. If you prefer to have some of your freight allocated by volume and some by dollar amount (for example), you would need to create a unique landed cost code for each of those allocation methods.
Before you can start tracking and allocating your landed costs, you must determine what types of landed costs you would like to allocate. It can help to reference an invoice from your customs agency as you are considering this.
Once you know which landed costs you wish to track and allocate, you can begin to enter your unique landed cost codes directly into your Acumatica ERP.
Summary of Steps (for more detail, see the full guide below)
- Create a new landed cost code
- Link a vendor to your landed cost code
- Decide how you want to enter landed costs
- Enter your landed costs
- Allocate the landed costs
- Verify accuracy
- Sit back and enjoy an easier landed cost transaction process
Here is your step-by-step guide to completing those tasks in order.
STEP 1: Create a New Landed Cost Code
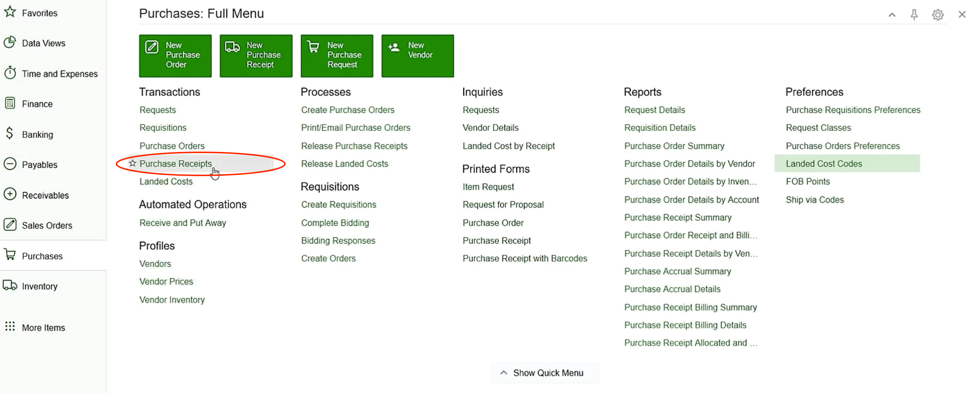
- Select “Landed Cost Codes” under the Preferences section of your Purchases menu tab in Acumatica.

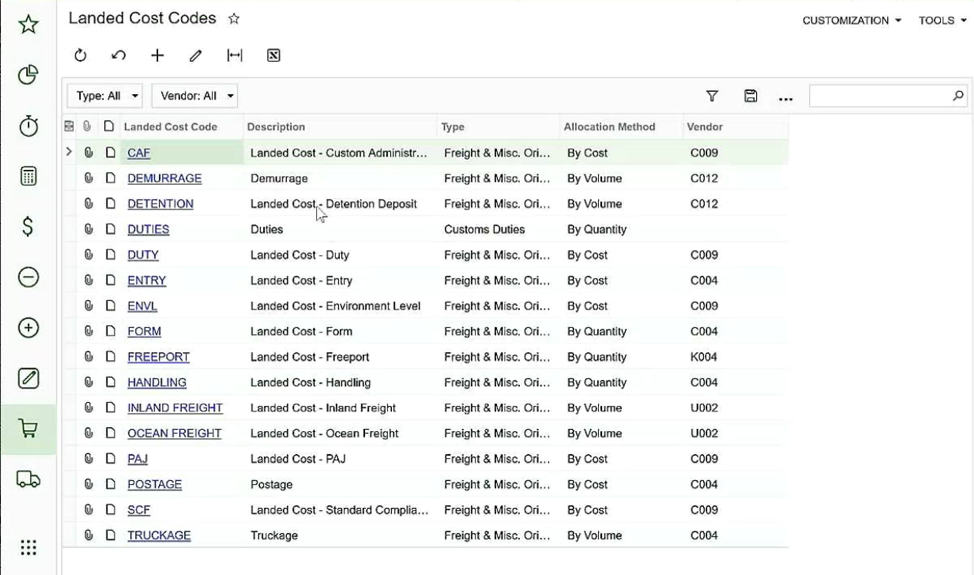
- Create each new landed cost code by clicking the “+” button at the top of the resulting Landed Cost Codes screen.

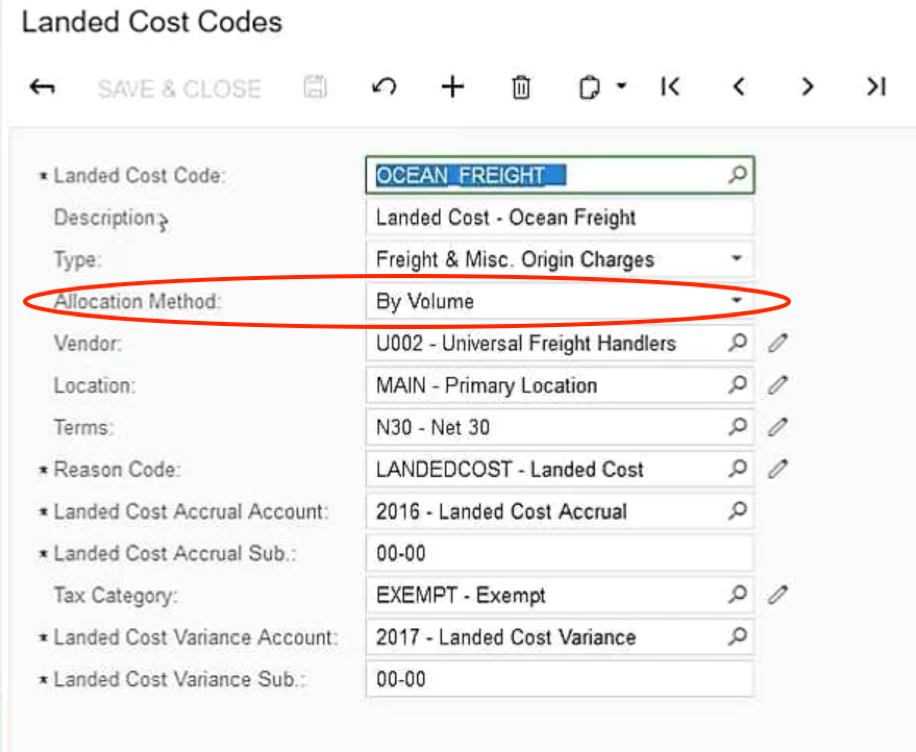
- Manually fill in the specific details of your company’s specific landed costs. This takes time and attention and is the hardest part of the process.When entering your landed cost codes, pay special attention to determining your Allocation Method (circled). Acumatica includes 4 pre-defined allocation methods (Quantity, Cost, Weight, Volume) automatically in your system to make this easier for you.
Tip: To create each landed cost code, you should reference the details on your invoices from the customs agencies or landed cost vendor. Each invoice will contain specific named charges and fees your business is responsible for. We recommend that you use the same naming conventions as the customs agency does on your invoice. That way, your books will match the customs invoice in your records.
Establishing your landed cost codes is the most important part of working with landed cost transactions in Acumatica. Though this process takes upfront time on your part, completing this step properly results in hours of saved time and much greater insight into your landed costs for months and years to come.
STEP 2: Link a Vendor to Your Landed Cost Code (recommended)
To ease your landed cost transaction allocation process, you may wish to link a specific landed cost code to a specific vendor.
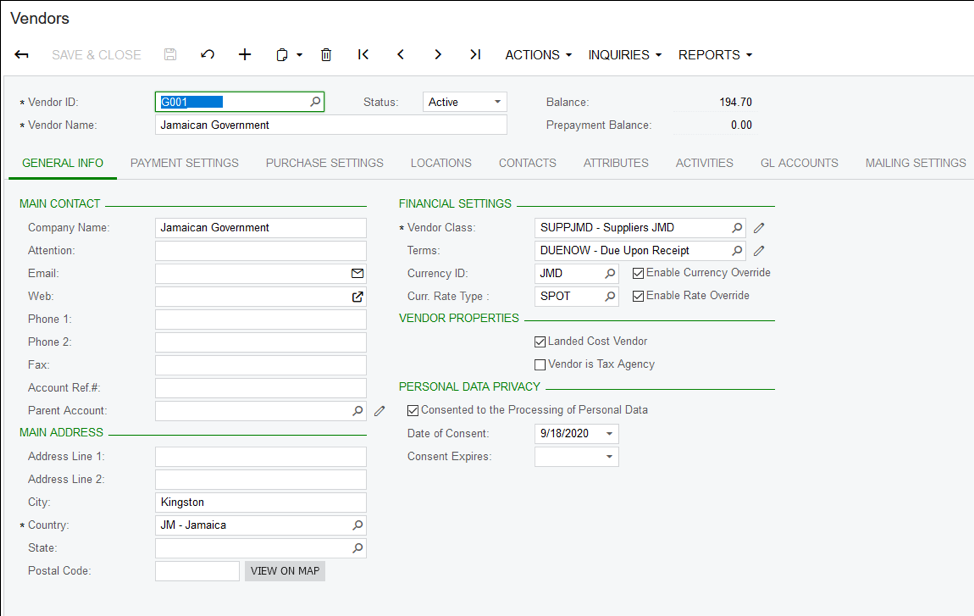
For example, perhaps you would want to link a specific customs agency (our example is the Jamaican Government) to a series of specific landed cost codes, so you can easily match those codes when your invoice arrives from the customs agency.
- In your Vendor Document, select the option indicating that you wish to use this vendor as a landed cost vendor. (If you do not select this option, you will not be able to use the vendor as a landed cost vendor.)
- Select that vendor when creating your landed cost codes.

STEP 3: Decide How You Want to Enter Landed Costs
- Choose one of two ways to enter your landed costs (option A or B below).
A. Enter the landed costs directly to a PO receipt
A1. Select “Purchase Receipts” under the Transactions section of your Purchases menu tab in your Acumatica.
A2. From the resulting Purchase Receipts screen, select the Action option and then select “Enter Landed Costs.”
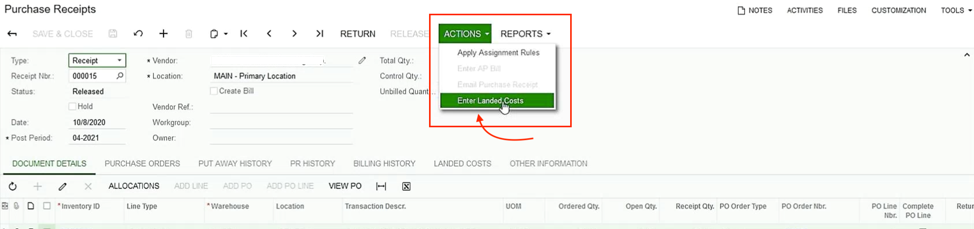
Tip: The benefit of entering landed costs directly to a PO receipt is that it automatically brings over the PO receipt origin information, which saves you a step in linking that information manually later.
If you have completed step A2, please skip to Step 4 below.
B. Create a new landed cost entry and link it to a PO receipt after the fact
B1. Select the “New Landed Cost” tile at the top of your Purchases menu tab in Acumatica OR select the “Landed Costs” option under the Transactions section on your Purchases menu tab in Acumatica.

Note: In our example above, we had to photoshop in a New Landed Cost tile in the image because the test company we were using was on a previous version. The latest version of Acumatica includes both the New Landed Cost tile and the “Landed Costs” option under Transactions.
STEP 4: Enter Your Landed Costs
- From the Landed Cost screen, you will click the “+” button to add a new landed cost code and choose its allocation method.

- Select the Landed Costs tab on the left.

- Select your vendor if you linked vendors to landed cost codes in Step 2. (If you did not link vendors to landed costs, you can simply enter your landed costs without selecting a vendor.)
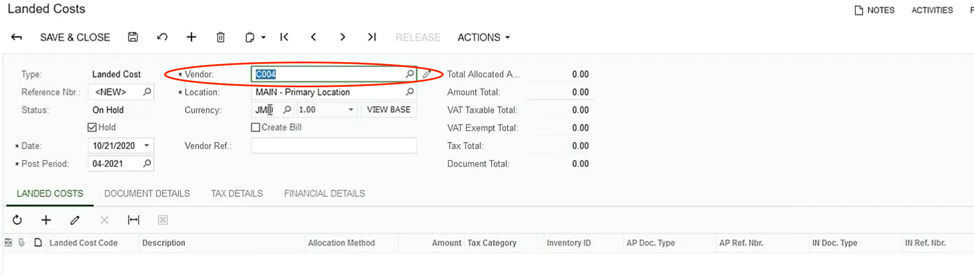
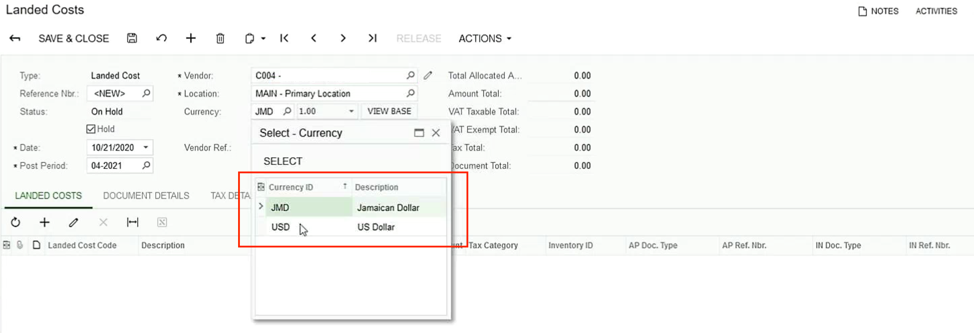
- Choose a different currency if you wish to.
- Select which landed cost codes to apply to the PO receipt by clicking on the magnifying glass to the right of your first blank landed cost code line and selecting the appropriate landed cost code from the pop up.
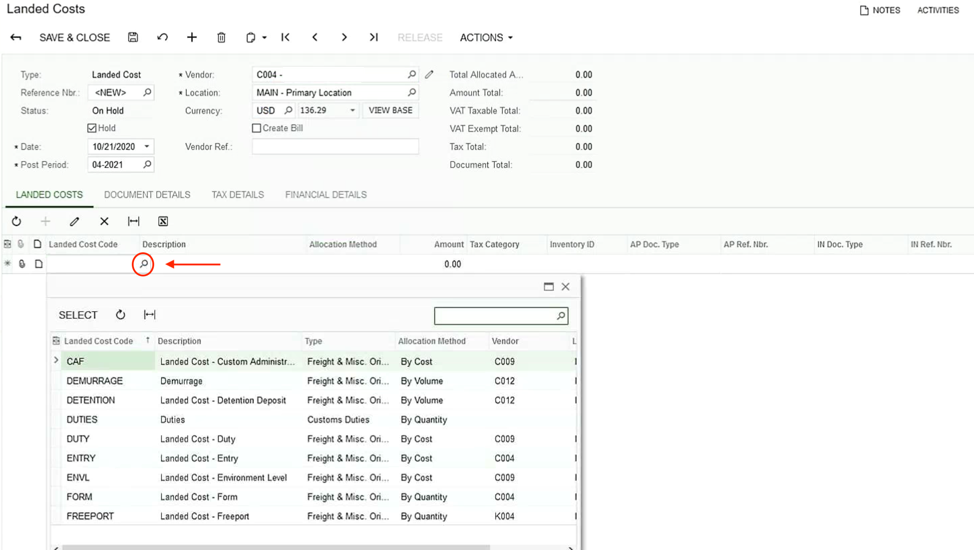
Tip: If you have linked your landed cost codes to specific vendors, only the cost codes associated with the selected vendor will appear in this list. If you did not select a vendor in this step, all your cost codes will be available. We recommend linking your cost codes to vendors, because it makes this step much easier.
- Enter your amount. (You would determine this precise amount by looking at the bill from customs.)
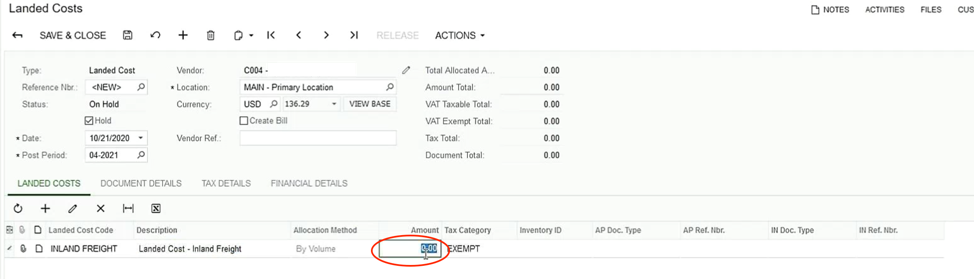
- You are likely to have more than one landed cost code to apply to each PO receipt. Keep adding new codes and entering amounts until you are done.
It is fine to select multiple landed cost codes with different allocation methods on this step – in fact, this flexibility one of the best parts of Acumatica’s landed cost transaction feature.
As you enter your landed cost codes, each will appear as its own line item:

Tip: If you used step B1 to create a new landed cost entry without first linking it to a PO receipt, you can now add PO receipts or PO receipt lines to your landed cost entry by following the below steps.
- Add a PO receipt or a PO receipt line to the landed cost entry (optional) by selecting the Document Details tab on your Landed Costs screen.
a. If you wish to allocate your landed costs to all items from a PO receipt, select “Add PO Receipt”…
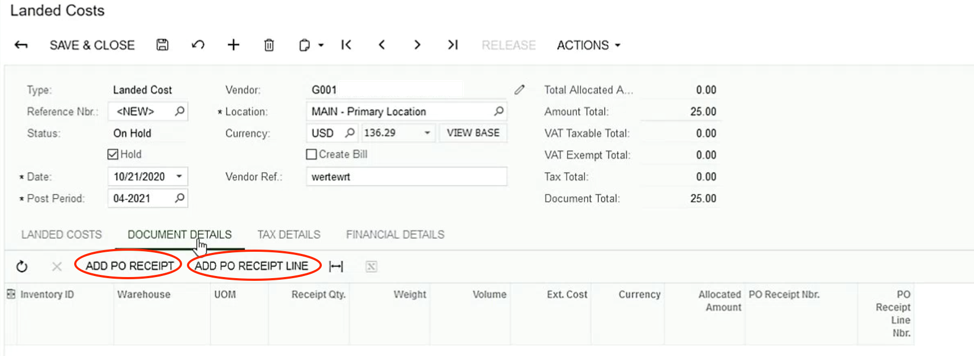
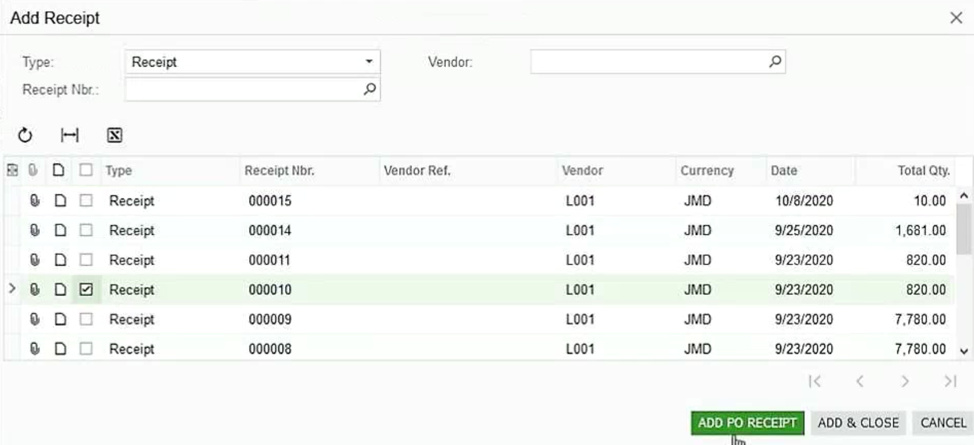
…and then select the receipt you wish to add by checking the box next to it.
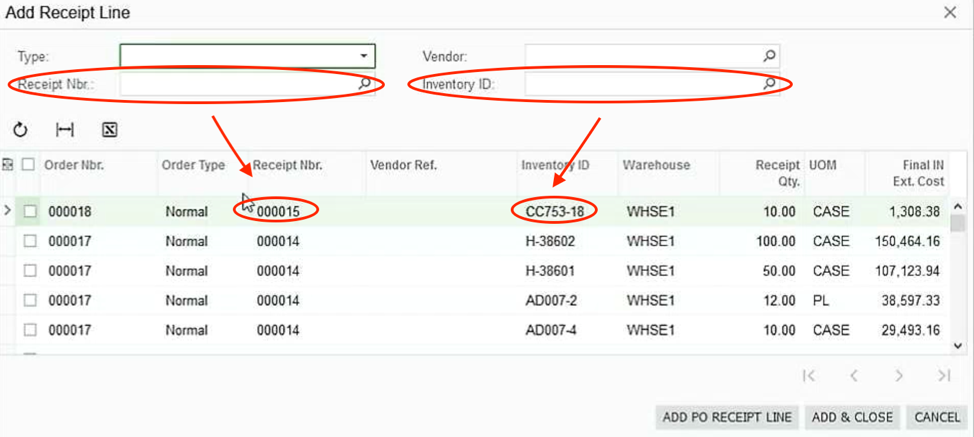
b. If you wish to allocate your landed costs only to specific line items on a PO receipt, select “Add PO Receipt Line”…

…and then select the specific PO receipt lines you wish to add.
Tip: All receipt lines are included in the default pop up that appears when you select “Add PO Receipt Line,” but you can filter your options by Receipt Nbr as well as by inventory ID if you wanted to search only for IDs that begin with a certain code such as CC or H (which are in lines 1-3 below).
- Select “Add & Close” to correctly link the PO receipt or receipt line with the landed costs.
STEP 5: Allocate the Landed Costs
- Remove from Hold (if necessary for your company’s configurations).
- Select “Create Bill.”
- Select Release at the top of your screen. This will process the landed cost transaction and adjust your inventory costs.
Tip: By selecting the “Create Bill” checkbox, your landed costs will automatically become an invoice in Accounts Payable, which you can process as a regular payable from that point forward.

- The screen will update with an inventory adjustment batch number. If you selected “Create Bill” an AP bill will also be created and will be listed under AP Ref. Nbr.

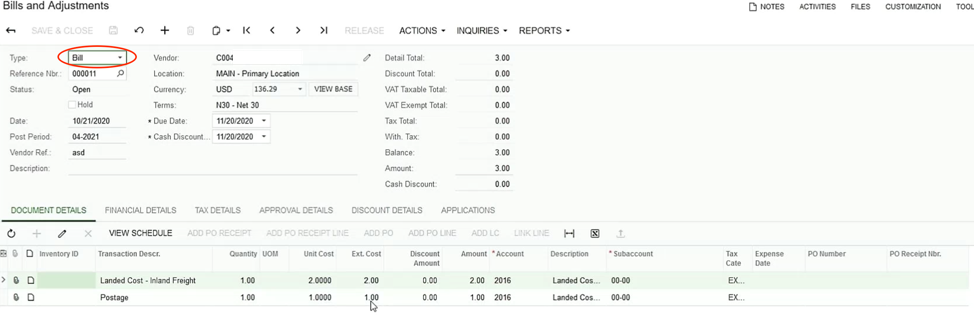
Tip: For your reference, the below is an image of the bill created by this landed cost allocation, which can be found in your Payables menu after releasing a PO receipt for which you have selected the “Create Bill” option
a. Save your landed cost entries using the save button at the top of the screen.
STEP 6: Verify Accuracy (optional)
- Select the Document Details tab to view the total allocated amount if you wish.

- Select “Adjustments” under the Transactions section of your Inventory menu tab in Acumatica ERP if you would like to view details for your inventory cost adjustments.

In the resulting Adjustments screen, you can see that the Unit Cost and Ext. Cost are different, without having changed the Quantity.
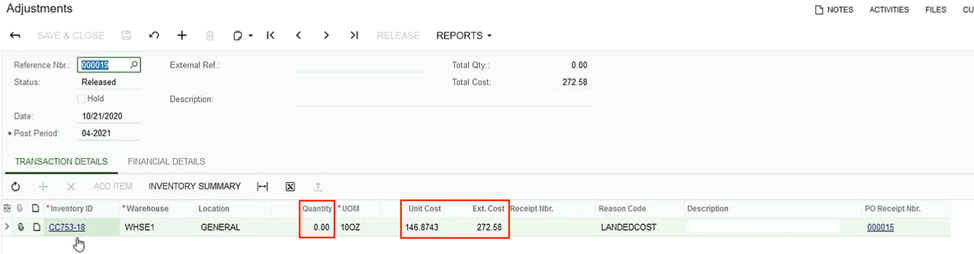
This demonstrates that your inventory cost has been adjusted and that your landed costs have been allocated, and that the cost of the inventory item has been updated. (In our example, the sample company determines average item costs and therefore the rolling average cost has changed.)
By this point, your GL will also have been updated, which increases your asset account for your inventory as well. Therefore, when you run an inventory valuation report, everything will reconcile properly to your inventory account in your GL.
Get Started with Acumatica Landed Cost and Complex Calculations Today
With the increased pace of globalization and global shipping, many modern companies are struggling daily to track and allocate their landed costs. Without in-depth insight into your landed cost transactions, your business may have difficulties determining your true profitability. Even worse, if the only way you have to track these costs is using a complex, multi-line spreadsheet, critical details may slip through the cracks unless you spend hours of your time entering data manually and then painstakingly double-checking it to ensure it is error free.
There is a better way.
If you would like more information about setting up your ERP solution to leverage the Acumatica landed cost transaction feature quickly and easily with single or multicurrency capabilities, all you have to do is contact the Acumatica partner that has developed a bullet-proof method for setting this function up seamlessly.
Get in touch with SWK Technologies to learn more – or have us do the work for you.
Michelle Hesketh, SWK Technologies