
Save Time and Eliminate Manual Copy-Pasting Work When Exporting Financial Report Data to Microsoft Excel
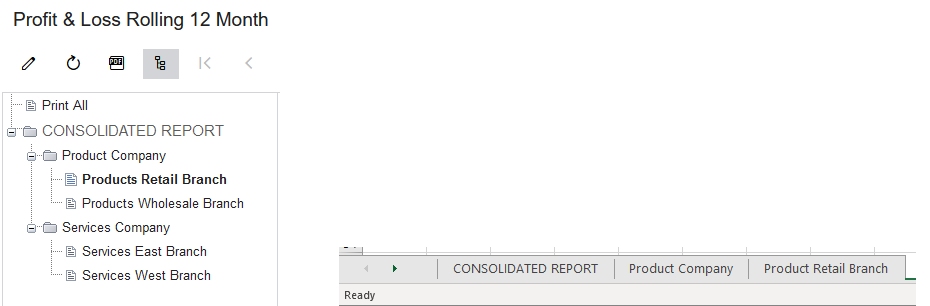
When generating financial reports, Acumatica Cloud ERP users have long requested the option to export consolidated reports and unit sets to separate tabs in Microsoft Excel. Instead, Acumatica publishes financial report data to a single Excel tab requiring significant manual copy and paste work to create the desired report.
Users requesting this functionality have heard that this would require modification of Acumatica and would not be available as an out of the box function. That is why the SWK Technologies team is proud to announce our solution, which automatically parses different report data into different tabs.

A huge congratulations to our talented team member, Acumatica MVP Sharon Conkey, who spent hours of development work figuring this out. Thank you, Sharon!
How To Export Acumatica Financial Report Data into Separate Tabs in Microsoft Excel
Exporting Acumatica report data into separate tabs in Excel requires that you first set up your export parameters and then run a macro. Here is how your team can complete those tasks quickly and easily.
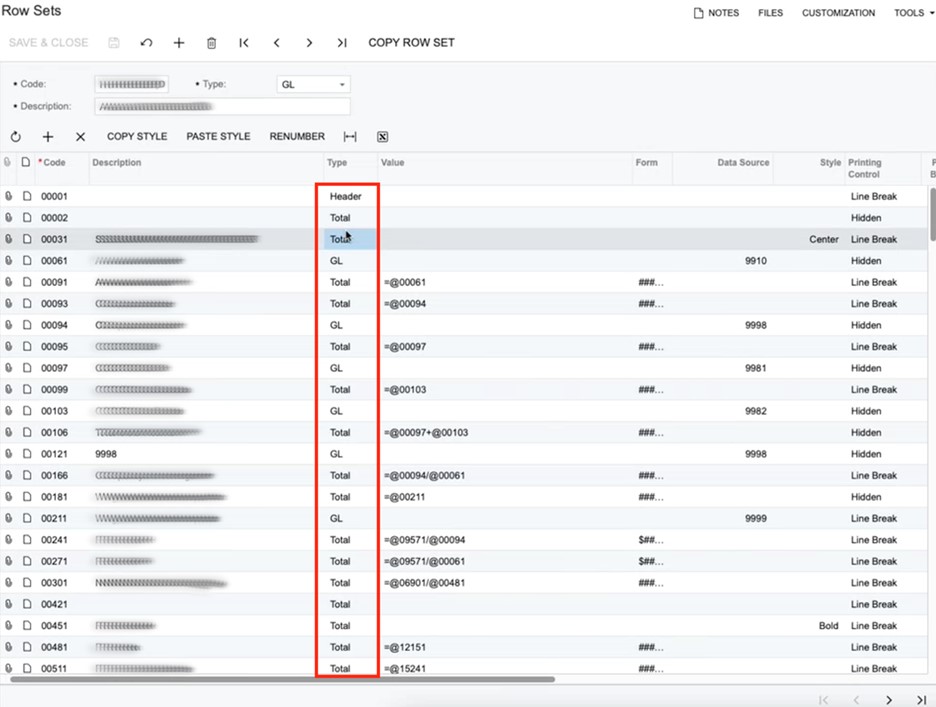
Step 1: Set up the rows for your report
It is easy for anyone on your team to set up an Acumatica report for streamlined export to Excel. Below, you will see what seems like a lot of steps to accomplish this, but each step is very quick and easy.
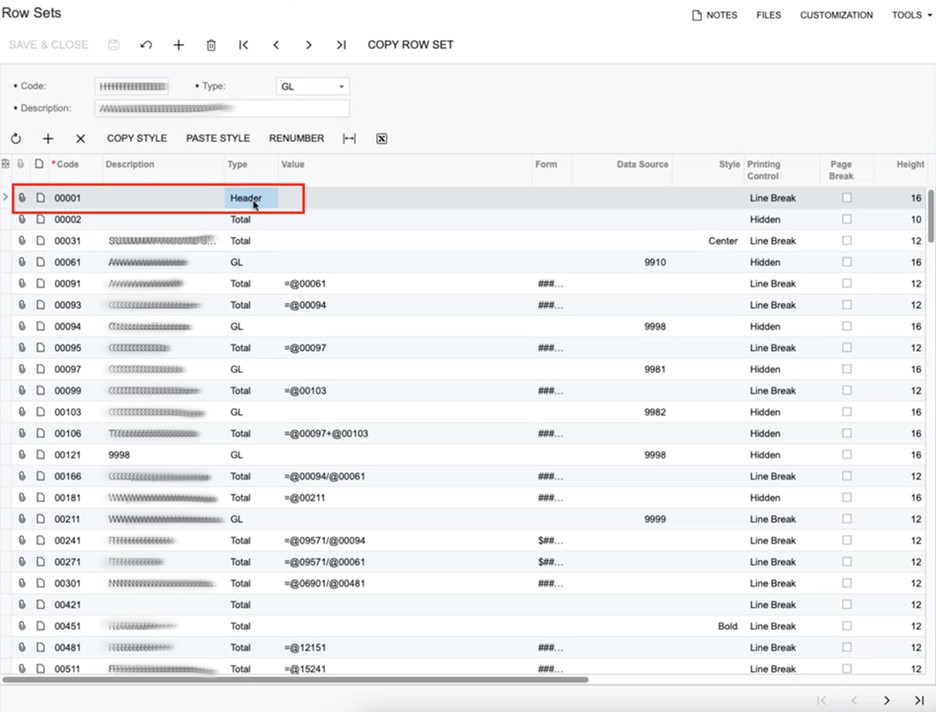
- Select the Row Set section in your Acumatica Report Definitions menu
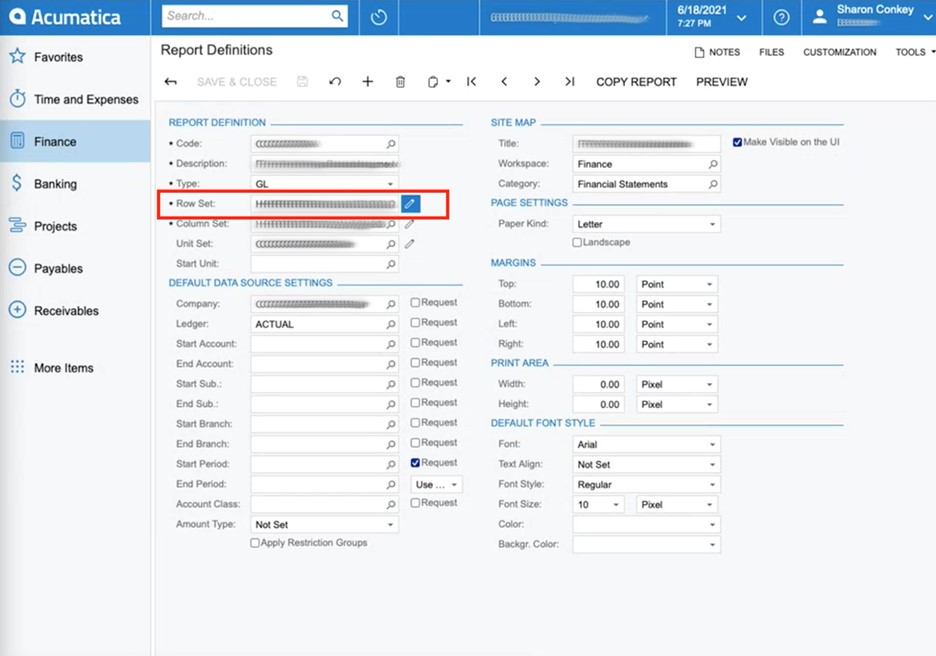
- Take the first row in the Row Set and name it “Header” under the “Type”
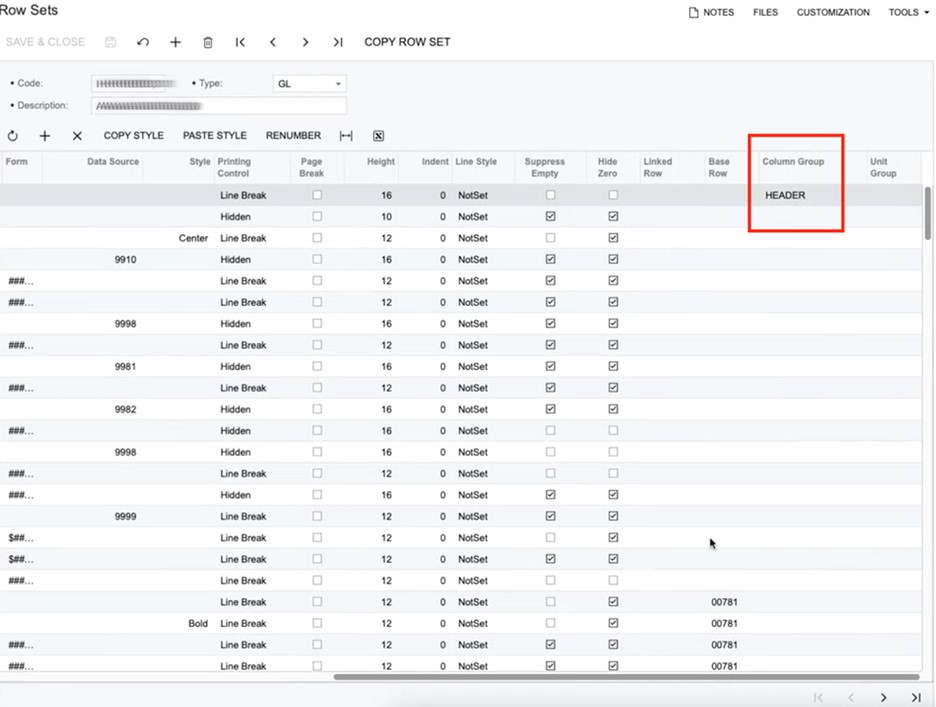
- On the same row, add the word “Header” to the Column Group field.
- Manually set each row in the type column as a Total or GL type (except the Header row). This is important because the other option, Caption, will export to Excel as a blank field and will disrupt the macro process.
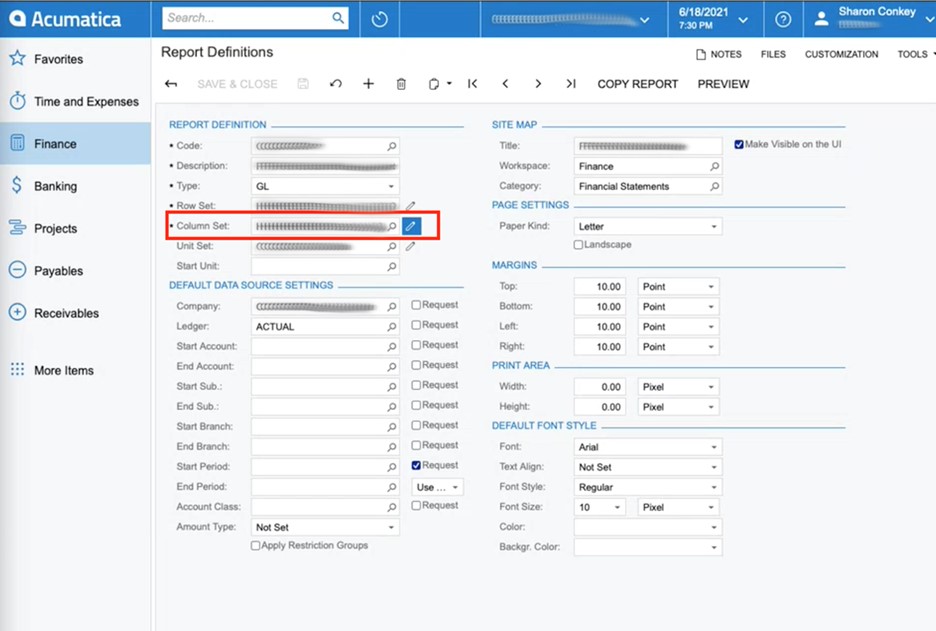
Step 2: Set up the columns for your report
After you have streamlined your rows, it will be time to streamline your column layout. Again, this looks like a lot of steps, but it is fast and easy to accomplish.
- Select the Column Set section in your Acumatica Report Definitions menu
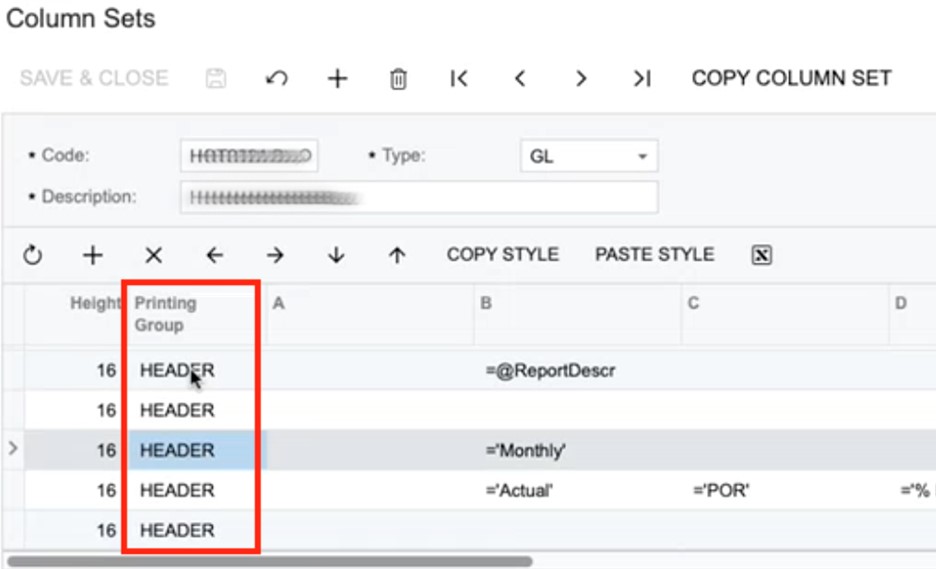
- Paste the same word from your column group into every row in your printing group (in this case, we used the word “Header” in the previous step).
- Add an extra calculated column at the far right of your report (in this case, the column is “Z”), which contains the formula to signal the macro. Ensure that the data in this column is included to every row of the column header and in the formula of the calc column because this formula is critical for the macro to create separate tabs.
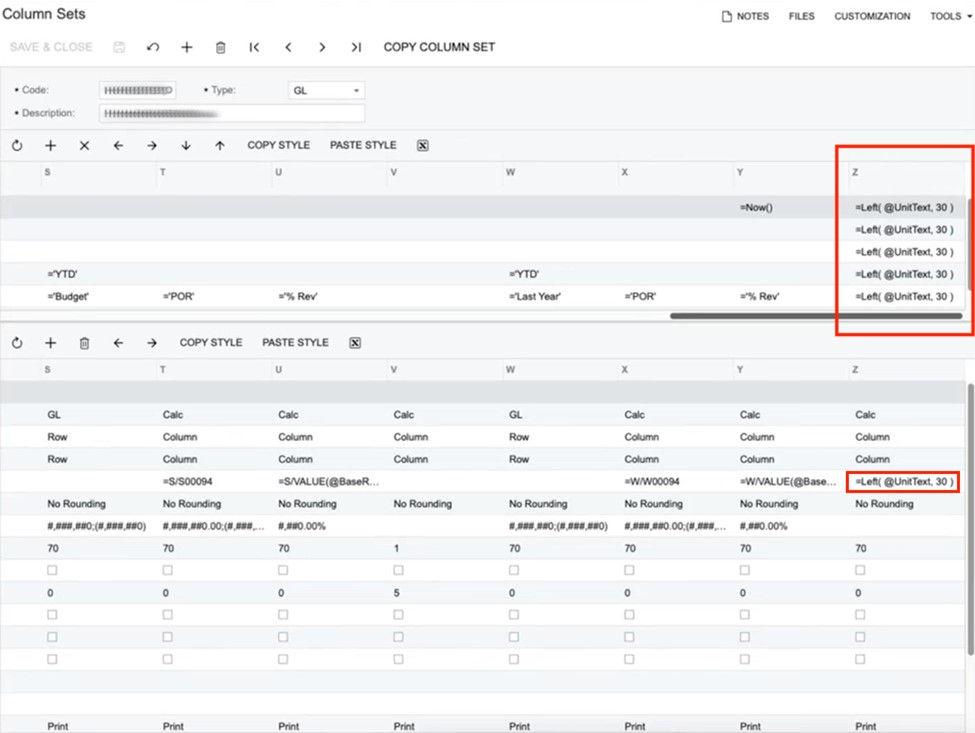
Excel standard functionality limits the sheet name to 30 characters. The formula above references the Acumatica @UnitText parameter, limiting it to the first 30 characters. This will be your sheet names in Excel.
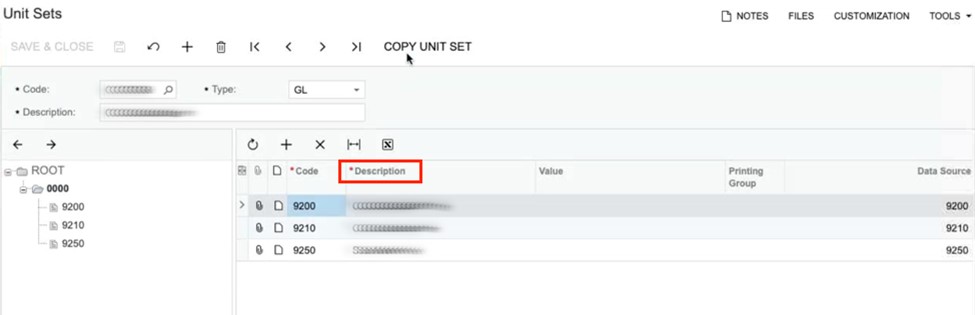
The Unit Text information can be found in the description column in your Acumatica unit set and can be adjusted (if need be) using the Unit Sets menu (see images below).
Step 3: Make the reports attractive for printing
Since this process requires you to export a macro-reference formula to the last column of every row in your Excel worksheet, we recommend you turn the text white in that final column in the column definition. This simple tip will help you keep your reports attractive, should you want to print them to PDF.
If these steps seem like too much work for you at this time, your SWK Technologies consultant will be happy to take care of all this for you.
Step 4: Run the macro
A macro in Excel is defined as a set of actions that you can record and save, so you can run them anytime and cut down on the number of repetitive tasks you need to perform. In this case, the macro will take care of copying and pasting for you in Excel, so you can parse your Acumatica data into multiple Excel tabs nearly effortlessly.
Creating a macro is hard work and takes coding know-how, but running a macro is easy. Since SWK Technologies will create your macro for you, all you will have to handle is the easy task of pushing a button to run the macro.
Note: This macro must be stored as a personal macro, which means it must be installed to each computer that will use it.
To run the macro:
- Select the Macros button to open your macro file list.
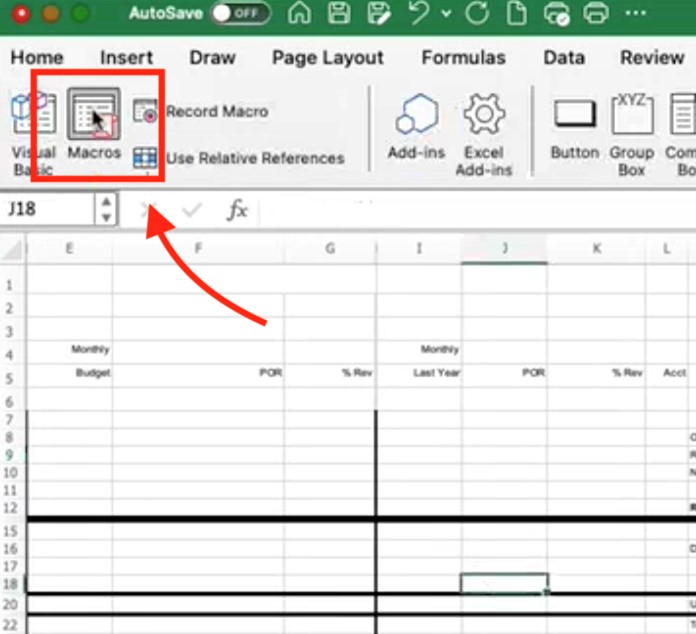
- Open the macro file on your computer from your personal macros and keep it open. In a Windows environment, you can set this macro to automatically open. Push Run to start the macro.
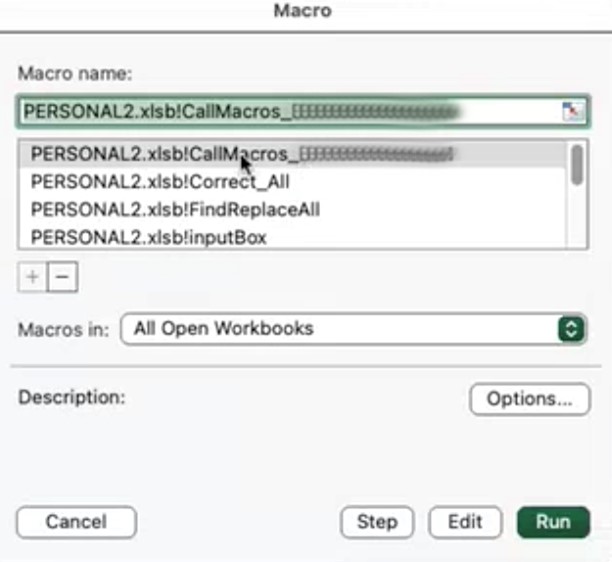
- Answer the macro prompt that asks you to “Enter UnitSet Constant Column.” Your constant column is your report’s farthest-right-hand column. This is the column that contains the formula data. You can ignore the UnitSet section of this prompt. (In this case, you would enter “Z,” because that is the furthest-right-hand column in your report. You can verify this by looking at the last column in your Column Set setup for this report in Acumatica.)
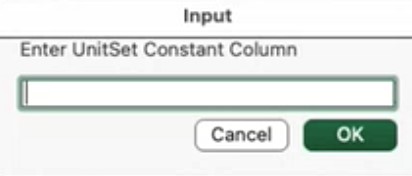
Manually confirming the constant column each time you run the macro will empower you to use this macro with as many reports as you wish. Since each report will have a different number of columns (and, therefore, a different furthest-right-hand column that contains the macro-reference formula), this step will help you tell your computer where to find the information it needs to complete its automation task efficiently.
Once you set the constant column, the macro will run. As it runs, it will wrap through every row, looking each time at the constant column to identify changes. Each change in the macro-reference formula in the constant column will signal the macro to create a new tab for you in Excel.
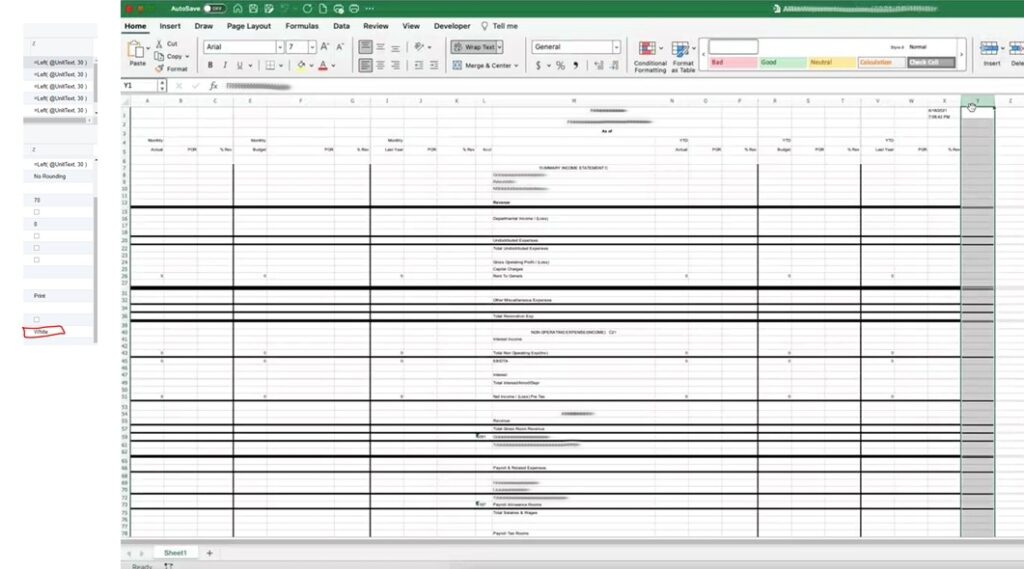
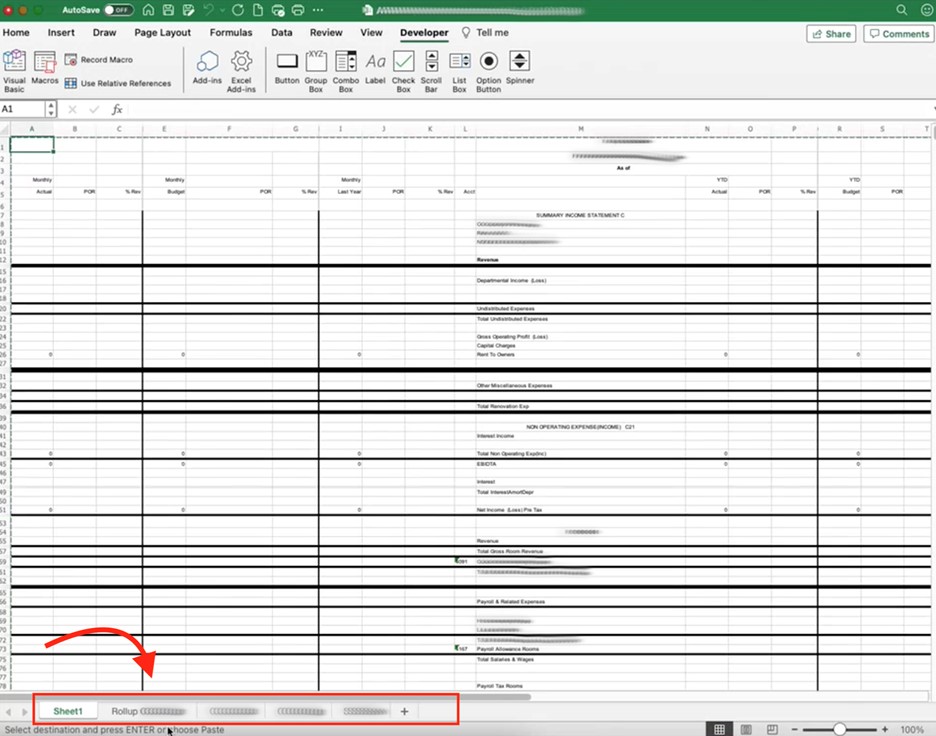
As soon as the macro is finished running, all of your tabs will display at once. This process typically only takes a few minutes. When the macro is done running, you will have a clearly parsed Excel worksheet with multiple tabs.
It will look like this:
Parsing Acumatica Data to Multiple Excel Tabs Is Fast and Easy to Set Up
Setting up an Excel macro leverages built-in Excel functionality. Your Acumatica and Excel programs already have everything they need to use this macro, with no customization work required for your ERP or Excel program.
To simplify your Acumatica report export process, all you will need is the SWK Technologies macro downloaded to each computer that will be using this function. The SWK Technologies team will be happy to set up that macro for you.
Contact SWK Technologies to Get Started with Your Macro.